


Unwanted noise is one of the most common obstacles when it comes to photography. Whether you're shooting in low light, pushing your ISO for a fast-action shot, or digitizing old family photos, unwanted grain can soften details and ruin an otherwise perfect image. For years, the solution was a compromise: traditional noise reduction tools would often blur fine details or create otherwise unnatural looking results.
Our Image Denoise tool changes the entire game. Even though it's a simple to use browser-based tool, it uses the same exact AI model in our flagship desktop application that removes unwanted noise while intelligently recovering and preserving the crisp details that make your photos special. All image processing done in the cloud, letting you enhance and render images on any machine.
Let's walk through the simple process of transforming your noisy photos into stunningly clean and sharp images in just a few clicks.
Step 1: Upload Your Photo

It's super simple to remove noise from your photos. Topaz Labs' AI-powered Denoise tool is web-based so there’s no complicated software to download.
- Navigate to the Topaz Labs AI Denoise tool in your web browser.
- Select the image file you want to denoise from your computer and upload it.
Step 2: Adjust Your Denoise Settings
Once your photo is uploaded, you have a couple of settings to adjust the noise reduction process. Our simple sliders allow you to fine-tune the output:
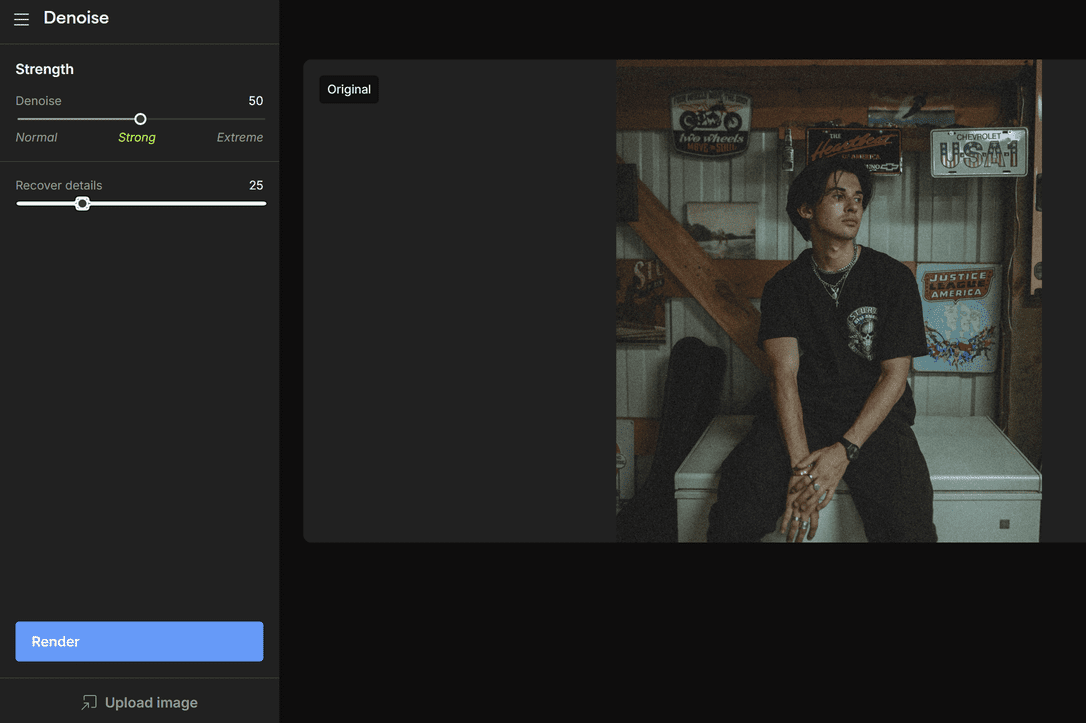
- Set the Denoise Strength: Use the main slider to control the amount of noise reduction, from a subtle touch-up to a more powerful cleaning for very grainy photos.
- Recover Original Detail: Use the "Recover Details" slider to ensure that important textures and fine details are preserved and enhanced, preventing any over-smoothing. This is especially useful for portraits where you want to maintain natural skin texture or wildlife shots where fur and feather detail is critical.
Step 3: Process your image
Once you've chosen your settings, you’re ready to process your image.
- Click the Render button.
- Our AI model will begin rendering your output, removing distracting noise while sharpening the details that matter (if you've selected the "Recover details" option). Denoising an image typically takes only a few seconds depending on the settings selected.
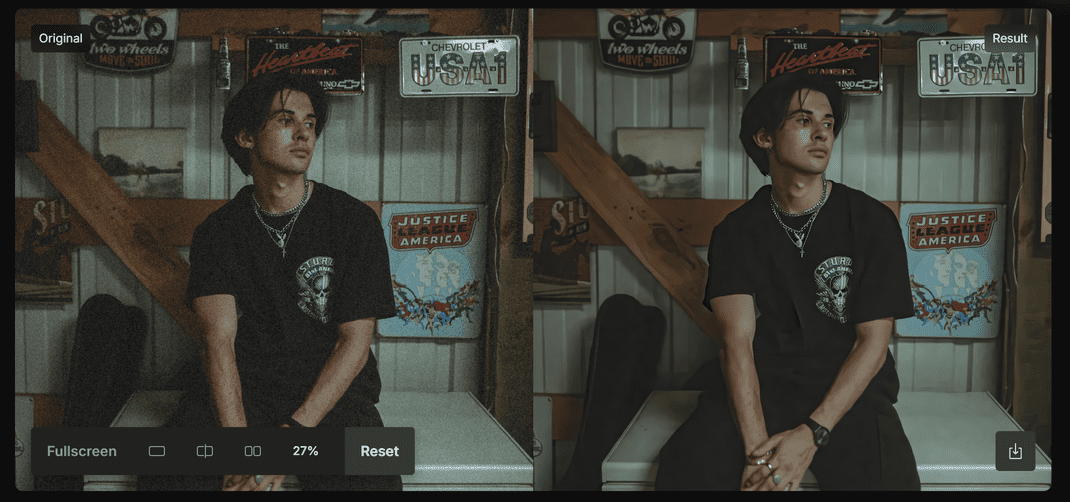
Step 4: Download Your Denoised Photo
Once processing is complete, you can view, compare, and download your newly denoised image.
- Compare the before and after images by selecting a view option on the bottom left of the image. Choose from split-screen, slider view, or full screen.
- You can download your rendered image ready to be shared, printed, or published by clicking "Download" on the bottom right of the completed image.
In just 3 easy steps, you've accomplished what used to take an hour using a compicated desktop application. You’ve successfully rescued a noisy photo and transformed it into a clean, professional-quality image without the need for complex software. By intelligently removing grain and recovering detail, you can shoot with confidence in any lighting condition, knowing you can achieve flawless results every time.