In a world where there are more screens than ever, there are even fewer excuses for poor quality videos. Footage captured in standard definition (SD 480p) or even 720p can look pixelated and blurry on modern displays, while 1080p can lack the fidelity that today's audiences expect. Whether you're a content creator polishing a YouTube video, a marketer upgrading promotional content, or someone restoring priceless family memories, enhancing your videos to crisp HD or 4K quality can make a dramatic difference.
What does enhancing video quality actually involve?
Before jumping in, it helps to understand what video enhancement covers — because "improve my video quality" can mean several different things depending on what's wrong with your footage.
Resolution upscaling increases the number of pixels in each frame, making the video physically larger and sharper on screen. Taking a 480p video to 1080p or 4K falls into this category.
Frame rate boosting adds new frames between existing ones to smooth out choppy or jerky motion, which is especially common in older footage and AI-generated video.
Topaz Labs' online video upscaler handleseverything in a single pass.
Should I enhance to HD (1080p) or 4K?
Choose 1080p HD if you're publishing to the web, uploading to YouTube or social media, or creating a digital archive for standard viewing. It's faster to process, widely compatible, and a significant improvement over SD or 720p source footage.
Choose 4K if your content will be displayed on a 4K TV or large-format screen, used in a professional production or broadcast workflow, projected at scale, or if you want headroom for future use as 4K displays become universal. Note that 4K output from low-resolution source footage will still show meaningful improvement — the AI reconstructs genuine detail rather than simply scaling up pixels — but the quality ceiling is partly determined by how much detail exists in the original.
What types of footage respond best?
The most dramatic improvements come from footage originally shot at 360p, 480p, or 720p. Old home videos, VHS and 8mm film digitization, camcorder recordings, and older archive footage are all strong candidates. 1080p footage also benefits from the sharpening, clarity, and frame rate features even if the resolution gain is smaller. AI-generated video — from tools like Kling, Sora, Midjourney, or Seedance — responds extremely well, since generative models typically output at lower resolutions by default.
Footage that is very heavily compressed or extremely degraded may have limits on how much detail the AI can recover, but will still show improvements in clarity and sharpness.
This guide will walk you through how to use Topaz Labs' online video upscale tool to transform your video in just a few clicks. Let's get started.
Step 1: Upload Your Video
Getting started is fast and easy. Because our AI Video Upscale Tool is a web-based tool, there is no complex software to download.
- Navigate to the Topaz Labs AI Video Upscale tool.
- Once you see this screen, you're ready to select which video file you want to enhance.
- Click the blue "Upload a video" button to open your file browser, or simply drag your video file onto the screen.

Step 2: Select Your Enhancement Settings
Once your video is uploaded, you'll have additional controls you can tune for your final output. These controls will be found on the left nav. Let's go over what each of these settings are.
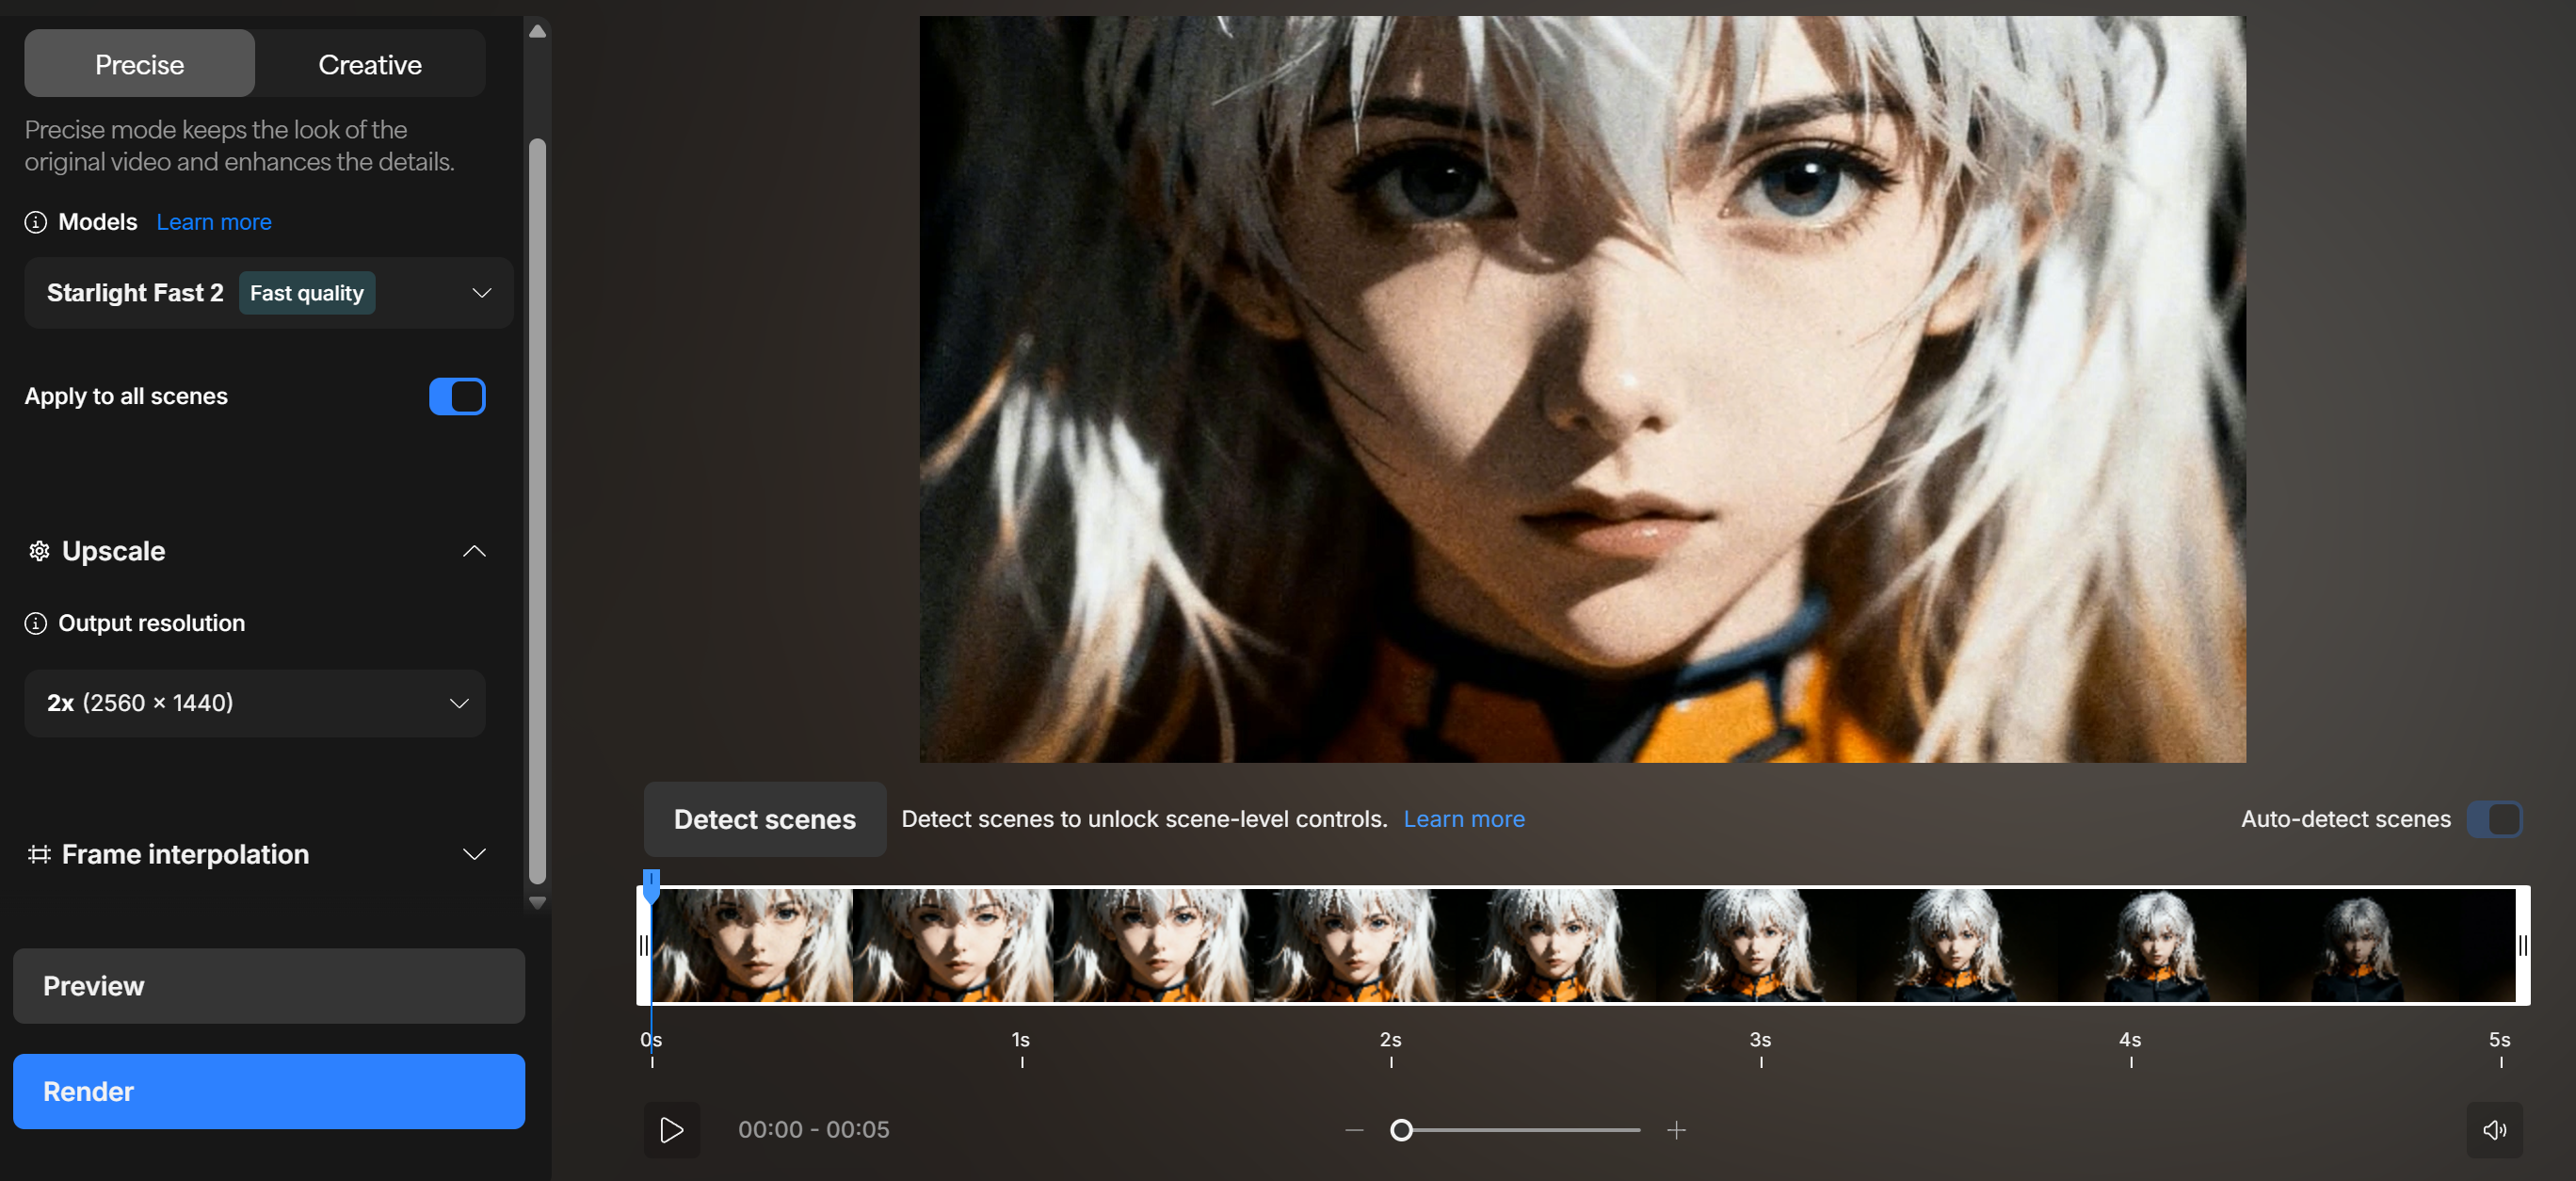
Starting from the top:
1. You have two main video enhancement modes: Precise or Creative.
Precise: Enhance the quality of your video while prioritizing the original look and intent of your input video.
Creative: Enhance the quality of your video while allowing certain levels of creative freedom with your input video.
2. Depending on which video enhancement mode you've selected, you can select which AI model to use by opening the "Models" dropdown menu. Each model will have its own benefits and use case.
Precise Mode is focused on accuracy, detail preservation, and controlled enhancements. It is ideal for professional workflows where maintaining the integrity of the original footage is important.
Available Models under Precise Mode:
- Starlight Fast 1- Formerly Starlight Speed, 1st-gen Starlight model optimized for speed.
- Starlight Fast 2- Deliver faster renders with more realistic look and sharper details.
- Starlight Precise 2- 2nd-gen Precise model, delivers best realism especially for faces & skin texture..
- Proteus- For all-purpose enhancement, sharpening, and cleanup.
- Starlight Mini- For scenes with fast movement, restoring low-res old footages.
- Rhea- For Scenes with minimal movement, interviews, product shots, and textures.
- Nyx- For reducing noise and grain while preserving original details.
- Iris- For enhancing faces in low-quality, interlaced, compressed footages.
Creative Mode is designed for stylized, expressive, and visually enhanced outputs. It is best suited for transformations where artistic quality is prioritized over strict accuracy.
Available Model under Creative Mode:
- Astra 1- For the highest quality, creatively enhancing AI-generated videos.
3. Under the Models dropdown, you should see a toggle labeled "Apply to all scenes". This allows you to choose whether to apply the same settings to the entire video or certain scenes within. Disabling this toggle will open up the scene detection menu where you can choose what settings to apply to which scenes in your video.
Underneath is the Upscale menu where you can choose what resolution your output will be. Depending on your input and selected AI model, you can upscale your video to 4K resolution.
Finally, the Frame Interpolation menu is the last option. Here, you are able to boost your video's frame rate as well as apply advanced slow-motion effects.
Once you've finalized your desired settings for your video enhancement, it's time to process your video.
Step 3: Preview Your AI-Enhanced Clip
Before processing the entire video, you can generate a short preview to see exactly how your settings will improve the footage. This allows you to fine-tune the enhancement and ensure you’re getting the best possible result.
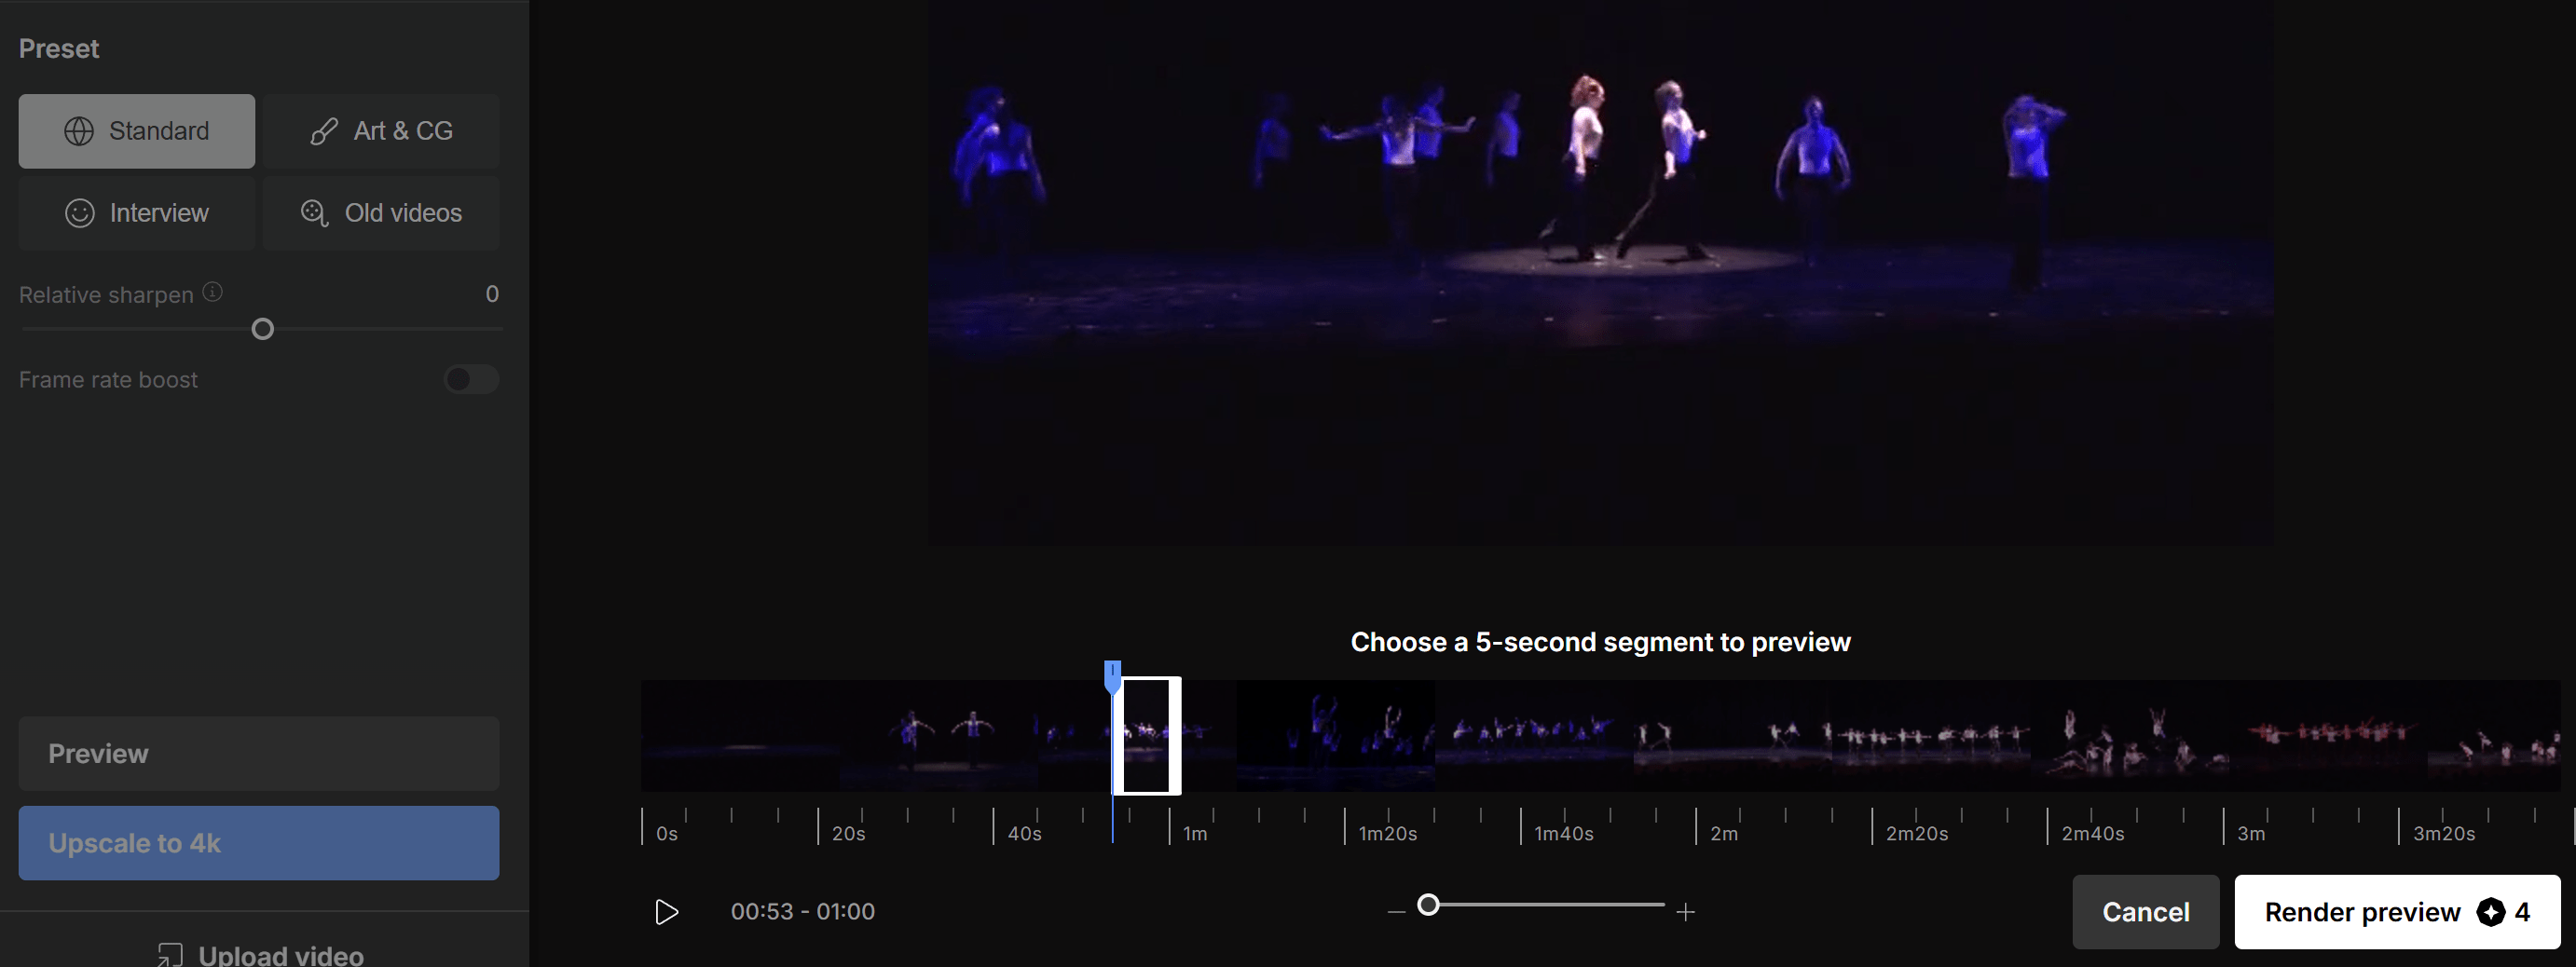
- Click the Preview button. You can then select a short snippet of your video to render with your chosen settings.
- Review the preview, paying close attention to the added detail, sharpness, and smoothness of motion.
- If you want to make adjustments, simply select a different AI preset or fine-tune other settings and generate a new preview.
Step 4: Download Your Enhanced Video
Once you are satisfied with the preview, you’re ready to process the entire video.
- Click the Process or Download button.
- We'll enhance your full video and convert it to a high-resolution video file.
- When the process is complete, you can download your new HD or 4K video, ready to be published, shared, or archived. No watermarks!
That’s all it takes. You’ve successfully transformed your video into a professional-quality file without any complicated software or technical expertise. By intelligently rebuilding your footage, you can breathe new life into old clips and ensure your new content meets the highest visual standards of today.