


Tabs are an incredibly useful feature in Topaz Video that can drastically speed up your workflows. Here's how to start taking advantage of them:
Please note that video examples use an older version of Topaz Video, but all content is still relevant.
Part 1: Introduction to Tabs in Topaz Video
Player Tab Views
The Player is where your video or image sequence will be displayed in Topaz Video. It occupies the most space in your workspace, and understanding its view modes is key to getting the most out of your enhancement workflow.
By default, your media is shown in Single view, which is indicated by the selected icon in the top-center toolbar. There are three different view modes — Single, Split, and Side-by-Side — plus a Maximize option for expanding the Player area.
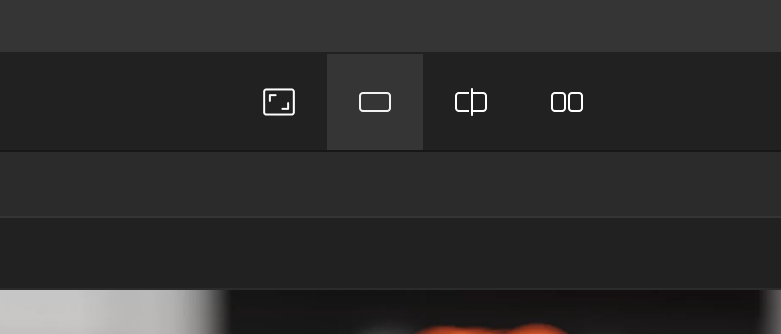
Maximize Player
In addition to the three view modes, there's an icon on the very left that expands the Player by hiding the Adjustments panel. This gives you a larger preview area when you want to focus on certain areas of your footage. Click the icon again to return to the default layout. It's simply expanding and going back toward the default — useful for getting a closer look without changing your view mode.
Single View
Single view shows just the one tab that's selected. You can see which tab is active by looking for the blue highlight above it — whichever one has the blue highlight is the selected tab, and that's what the Player will display. You can click between tabs to switch which one is shown.
Split View
Split View divides the Player vertically with a slider down the center, showing two different halves of the same frame. You can drag the slider to adjust the split position. This lets you compare the tab that's selected on one side versus the tab on the other — a great way to evaluate how different enhancement settings affect the same frame.
Side-by-Side View
Side-by-Side is similar to Split View, except there is no slider. Instead, you get two independent player panels that you can zoom and pan separately. This means you're able to zoom in — say, to a specific detail like a person working in the scene — and compare between the right tab that's selected versus the left tab at whatever zoom level you choose.
One key thing to note: you'll see that some tabs appear in dark gray. The tabs that are dark gray are the ones currently being compared in the Side-by-Side view.
Part 2: Renaming, Moving, & Filters with Tabs
Renaming Tabs
One of the nice things you can do with tabs is rename them. Simply double-click on a tab name and type in whatever makes sense for your workflow — for example, "Test1" or "Test2." You're able to rename any of your tabs this way, making it easy to keep track of different enhancement configurations as you experiment.
Moving Tabs
If you don't want your tabs to be on one side or the other, you can simply drag them to reorder. In Single view, you can drag tabs around, or you can just as easily hit the button to push all of your tabs to the left.
You're also always able to grab a tab and move it more freely — you'll see how it highlights each section as you drag. Drop it in the tab bar to reorder, or drop it on the side of the player panel to instantly create a Side-by-Side view. The tabs are fully maneuverable — they're free for you to move around to compare as needed.
Applying Filters
Once you have your tabs set up, you'll probably want to try a couple different variations of your enhancement settings — and you're able to do exactly that. For example, starting with a tab called "Test1," you can enable Enhancement and select an AI model like Proteus.
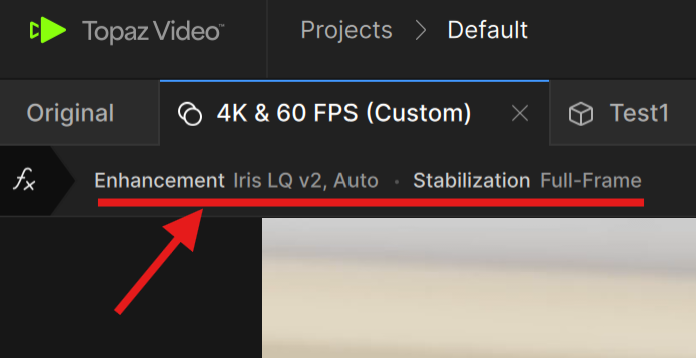
As soon as you apply a filter, the tab label updates to show exactly what's configured on that tab. If you haven't enabled parameters yet, it will show as a basic configuration. The moment you decide to enable parameters, you can choose between Auto, Dynamic (which adjusts relative to the content), or Manual mode — giving you full control over the enhancement sliders like Fix Compression, Improve Detail, Sharpen, Reduce Noise, Dehalo, and Anti-alias/Deblur.
Part 3: Using Tab Comparisons
One of the most powerful aspects of Topaz Video's tab system is the ability to compare different enhancement settings against each other — or against the original source. Once you've set up a couple of tabs with different filters, there are several ways to quickly evaluate the differences.
Setting Up Tabs for Comparison
To demonstrate, let's say you have an Original tab with no enhancements, and you create a second tab with Enhancement enabled using the Proteus AI model set to Auto. This tab has no parameters enabled — it just applies the default Proteus settings. You might then create a third tab — "Proteus Man" (Proteus Manual) — where you enable parameters, switch to Manual mode, and crank all the sliders to extreme values just to see the difference. With Fix Compression, Improve Detail, Sharpen, Reduce Noise, Dehalo, and Anti-alias/Deblur all maxed to 100, you'll get an exaggerated result that makes the comparison easy to see.
Click-and-Hold Comparison
Under normal circumstances, if you have an enhancement on a tab and want to compare it against the Original, you don't need to switch to Split View or Side-by-Side. Instead, simply click and hold the left mouse button on the Player. While you hold, the Player shows the Original source. When you let go, it snaps back to the enhanced version. This makes it easy to toggle back and forth and spot exactly what the enhancement is doing.
You can also use this in the other direction: if you're on the Original tab and click and hold, it will show the enhanced tab for comparison.
Using Split and Side-by-Side Views
Of course, you can also use Split View or Side-by-Side to compare tabs visually. For example, placing Proteus Auto on the left and Proteus Manual on the right lets you evaluate the difference between the automatic and manual settings at a glance.
Right-Click to Set Comparison Tab
There's another way to set up your comparison. In Single view, right-click on any tab and select "Set as Comparison Tab." This tells Topaz Video which tab to compare against when you use the click-and-hold gesture. For instance, if you're on the Proteus Manual tab and you set Proteus Auto as the comparison tab, clicking and holding will now toggle between Proteus Manual and Proteus Auto — rather than defaulting to the Original source. This is useful when you want to compare two different enhancement configurations directly.
The Timeline Preview Bar
You may have noticed colored bars appearing on the timeline at the bottom left. These indicate render preview progress. When you switch between tabs — say from Proteus Auto to Proteus Manual — you'll see the green preview bar update to reflect how much of the timeline has been previewed for that specific tab's settings.
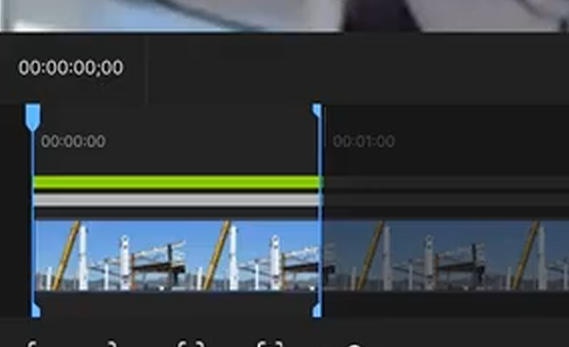
The preview bar has two parts: the green section shows how much of the video has been rendered as a preview for the currently selected tab, and the length of the bar represents how far along the comparison hold has been previewed. When you remove a comparison or switch tabs, the preview bar resets accordingly. If you click and hold to compare, it will show the original source, and when you let go, it returns to the enhanced version.
Part 4: Copying & Pasting Tabs in Topaz Video
What if you want to copy specific settings from one tab and duplicate them — either to another tab on the same source or to an entirely different source? Topaz Video makes this straightforward with keyboard shortcuts and a few other options.
Setting Up Custom Settings
To demonstrate, let's say you've duplicated an existing tab's settings and want to modify them. You switch to Manual mode under the Proteus AI model and dial in your own custom values — perhaps something like Fix Compression at 100, Improve Detail at 0, Sharpen at 71, Reduce Noise at 54, Dehalo at 50, and Anti-alias/Deblur at 50. After rendering the first frame as a preview, you're happy with how it looks and want to reuse these exact settings elsewhere.
Copy/Paste with Keyboard Shortcuts
The quickest way to duplicate settings is with standard copy/paste shortcuts. On the tab with your finalized settings, press Ctrl+C (or Cmd+C on Mac) to copy. Then navigate to where you want to apply them — this could be a new tab on the same source, or a completely different source in your project. Once there, press Ctrl+V (or Cmd+V) to paste. All of the parameters and enhancement settings are applied instantly.
Pasting Settings to Different Sources
You're not limited to pasting within the same source. Open your Sources panel, select a different video file, create a new tab, and paste with Ctrl+V. The settings transfer over exactly — same AI model, same parameter mode, same slider values. This is a huge time-saver when you have multiple source files that need similar treatment.
Right-Click Options
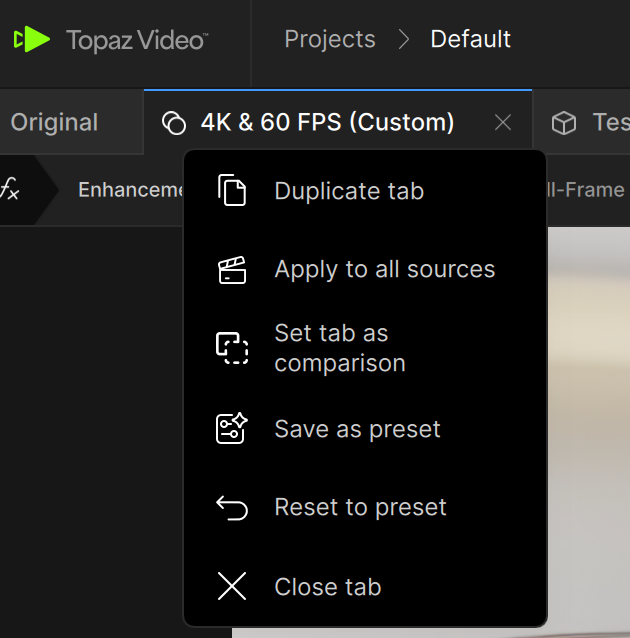
There are also right-click options available on tabs. You can save settings as a preset or apply them to all sources at once. However, if you want to be selective about which sources get the settings, the copy/paste approach gives you more control — you pick exactly where to apply them.
Fine-Tuning After Pasting
After pasting settings to a new source, you may find that the enhancement is a little too strong (or not strong enough) for that particular shot. That's fine — you can always tweak individual sliders after pasting. For example, you might bring the Sharpen value down a couple of parameters if the footage doesn't need as much sharpening as the original source did. The pasted settings are just a starting point.
Duplicating Tabs with Ctrl+D
Another useful shortcut is Ctrl+D, which duplicates a tab within the same source. One nice benefit of duplicating: if the exact same settings already have a cached render preview, you don't have to re-render. The preview is already there because the identical settings have already been processed. The moment you change anything on the duplicate, though, you'll need to update the preview — but as long as the settings remain identical, the cache carries over.
Now try using tabs in your next project in Topaz Video.