


This walkthrough covers the SDR to HDR filter in Topaz Video, which converts standard dynamic range footage into high dynamic range for playback on HDR-capable displays.
Note: The version of Topaz Video shown in the above video may differ slightly from yours. However, the below explanation is still applicable to all current versions of Topaz Video.
What is Dynamic Range?
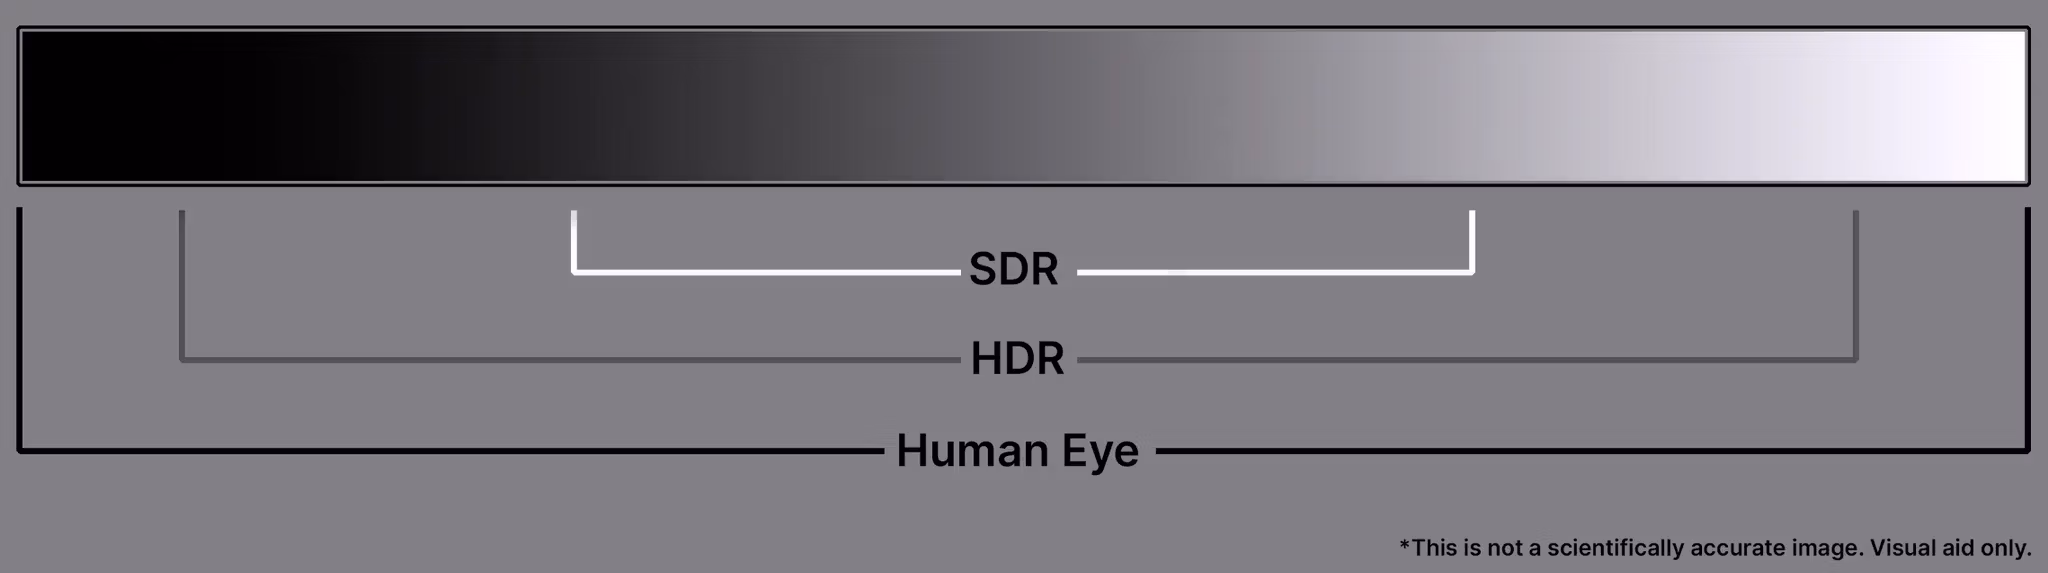
Dynamic range is the contrast between the brightest highlights and darkest shadows in a video. SDR and HDR represent two different scopes of that range:
SDR (Standard Dynamic Range) holds 6–10 stops of dynamic range, uses 8 bits per channel (24 bits per pixel), and peaks at around 100–400 nits of brightness depending on the display, with a contrast ratio of roughly 1,200:1.
HDR (High Dynamic Range) holds 12–17.6 stops of dynamic range (though most cameras top out around 15), uses 10 bits per channel (up to 32-bit floating point), peaks at around 10,000 nits (though most HDR monitors display up to 1,000 nits), and achieves contrast ratios of roughly 20,000:1 on LCD or up to 1,080,000:1 on OLED displays.
In practical terms, HDR holds more range in midtones and shadows while pushing highlights and darks further apart. HDR video represents a closer range to what the average human eye can perceive compared to SDR.
What is Inverse Tone Mapping?
Topaz Video converts SDR to HDR by generating Inverse Tone Mapping (ITM), also known as "Up Mapping." This process uses the luminance values within the limited SDR imagery to push more range and create a larger scope of color data.
The conversion also transforms BT.1886/Rec.709 standard SDR content (the standard that ensures consistent color display across monitors) to BT.2100/PQ (Perceptual Quantizer) standard HDR, making the result viewable on HDR screens.
Do I Need an HDR Display to Convert SDR to HDR footage?
This feature is dependent on your viewing setup. You will need an HDR-capable display to see the conversion accurately. Most recent phones, TVs, desktop monitors, and some handheld gaming displays support HDR, but not all HDR displays are created equal. The maximum values you can view depend on your specific hardware.
If you view HDR video on a non-HDR display, highlights will appear clamped or clipped — the values are out of range for the display. In Topaz Video, the filter status label in the upper left changes to "HDR" when the filter is enabled. On an SDR monitor, the preview will look washed out and desaturated. This is expected.
Controls
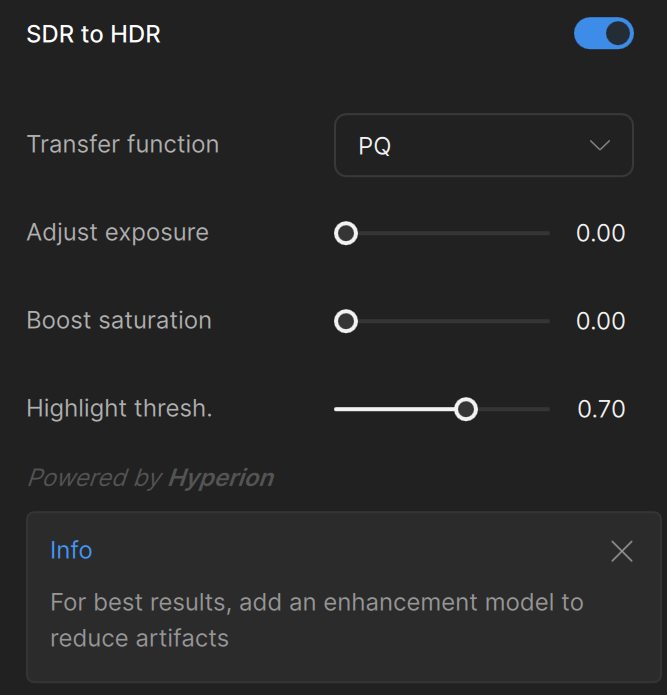
The SDR to HDR filter is located in the Adjustments sidebar between Frame Interpolation and Stabilization. Toggle it on to reveal the controls. Starting from the top:
Transfer Function
You can select which type of HDR transfer function to use. There are two options: Perceptual Quantizer (PQ) or Hybrid Log-Gamma (HLG). PQ is the default selection and should work well for most purposes.
Adjust Exposure (default: 0.00, range: 0.00–1.00)
Modifies the overall exposure of the HDR output. At 0.00, the AI model's default mapping is used. At 1.00, the exposure is approximately doubled. The AI model intelligently chooses which areas to brighten based on the video content rather than applying a uniform adjustment.
Boost Saturation (default: 0.00, range: 0.00–1.00)
Increases color intensity from the original amount. A little goes a long way — keeping values low (around 0.10–0.40) tends to produce natural, realistic results. Pushing saturation too high can make the image look artificial.
Highlight Threshold (default: 0.70, range: 0.45–0.85)
Sets the lowest intensity level in linear color space that the Hyperion model treats as a highlight. The recommended starting point is 0.70.
Lowering this value can cause color shifts and large contrast changes, which are most noticeable on skin tones. If you notice slight color shifts, raise the value. Otherwise, you can experiment with lower settings.
AI Model: Hyperion
Hyperion is the dedicated AI model for SDR-to-HDR conversion. It performs the inverse tone mapping that increases color depth, contrast, and peak brightness. It is currently the only model available for this filter.
Previewing Your Results
After adjusting your settings, render a preview to see the HDR output. An HDR display is needed to view the results properly.
The application also provides a tip beneath the controls: "Add an enhancement model to reduce artifacts." Pairing SDR to HDR with an Enhancement filter (such as Proteus) helps clean up compression and artifacts, which generally produces better HDR results.
Note for macOS users: The in-app HDR player may require an external player to preview HDR updates. See the Alternative Players section below.
Compatible Codecs
The following codecs work with SDR to HDR output: ProRes 422 (Proxy, LT, Standard, HQ), H264 High, H265 (High, Main, Main10), AV1 10-bit, PNG 16-bit, QuickTime V210 Uncompressed YUV 10-bit 4:2:2, and QuickTime R210 Uncompressed RGB 10-bit.
Codecs with known issues: TIFF, JPEG 8-bit, EXR, and DPX render flat colors. VP9, QuickTime Animation, and FFV1 have playback compatibility issues with QuickTime Player and Premiere.
Not compatible: ProRes 4444 XQ.
Plugin availability: SDR to HDR is not currently available for the Adobe After Effects or DaVinci Resolve plugins.
Alternative Video Players
If you need a player with tone mapping to view your HDR output:
- Windows: MPVnet-Player
- Mac: IINA
Things to Consider about SDR to HDR conversion
SDR to HDR is a very adaptive tool that works on most footage, but it's creating a faux HDR from SDR source material. Keep the following in mind:
- Interlaced footage doesn't work well with this filter. Deinterlace first before applying SDR to HDR.
- Pair with Enhancement. Using an enhancement model alongside Hyperion produces better results, since fewer compression artifacts and cleaner source detail give the HDR conversion more to work with.
- Low-resolution footage can be upscaled and converted, but use subtle Hyperion settings. The more image data and resolution in your source, the better the starting point.
- Moving shots with inconsistent lighting may cause visual surging or blooming as the tool adapts frame by frame. Quick cuts are actually less of an issue since some variation is expected.
- Very dark or very bright footage may not convert well. If the source has too narrow a range to begin with — either muddy and underexposed or blown out and overexposed — there's too little data for the AI to build upon.
