


This walkthrough covers the first section of Topaz Video's Enhancement controls — specifically how to configure your output resolution and how to choose the correct video type for your source footage.
note: some UI elements in this video might not appear exactly the same to your version of Topaz Video, but all functionality is present.
Enabling Enhancement
In the Adjustments sidebar, you'll see the Enhancement section near the top. By default, it's toggled off. Click the toggle to enable it, and the full set of enhancement controls will expand below — including output resolution, video type, AI model selection, and additional parameters like noise, detail recovery, focus fix, and grain.
Output Resolution
With Enhancement enabled, the first setting you'll see is Output resolution. By default, it's set to your source's original resolution (e.g., 1920×1080). Click the dropdown to see all available options:
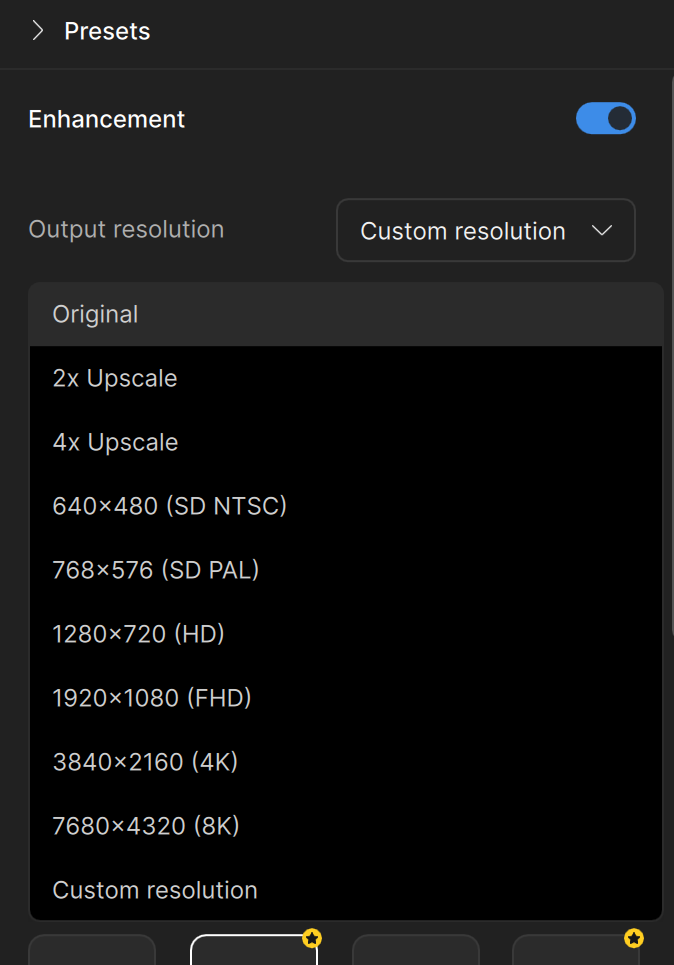
- Original — Keeps the source resolution as-is (useful for enhancement-only workflows without upscaling).
- 2x Upscale — Doubles the resolution (e.g., 1080p becomes ~4K).
- 4x Upscale — Quadruples the resolution (e.g., 1080p becomes ~8K).
- 640×480 (SD NTSC)
- 768×576 (SD PAL)
- 1280×720 (HD)
- 1920×1080 (FHD)
- 3840×2160 (4K)
- 7680×4320 (8K)
- Custom resolution (more on this below)
Custom Resolution
Selecting Custom resolution reveals additional controls for fine-tuning your output dimensions. You'll see fields for Width (W), Height (H), and a Scale (%) value.
The Aspect ratio checkbox "Lock" keeps the width and height proportional. When locked, changing one dimension automatically adjusts the other.
The Resize method dropdown lets you choose how Topaz Video calculates the output size:
- Prioritize width — You set the width, and the height adjusts automatically to maintain aspect ratio.
- Prioritize height — You set the height, and the width adjusts.
- Prioritize scale — You set a scale percentage, and both dimensions adjust accordingly.
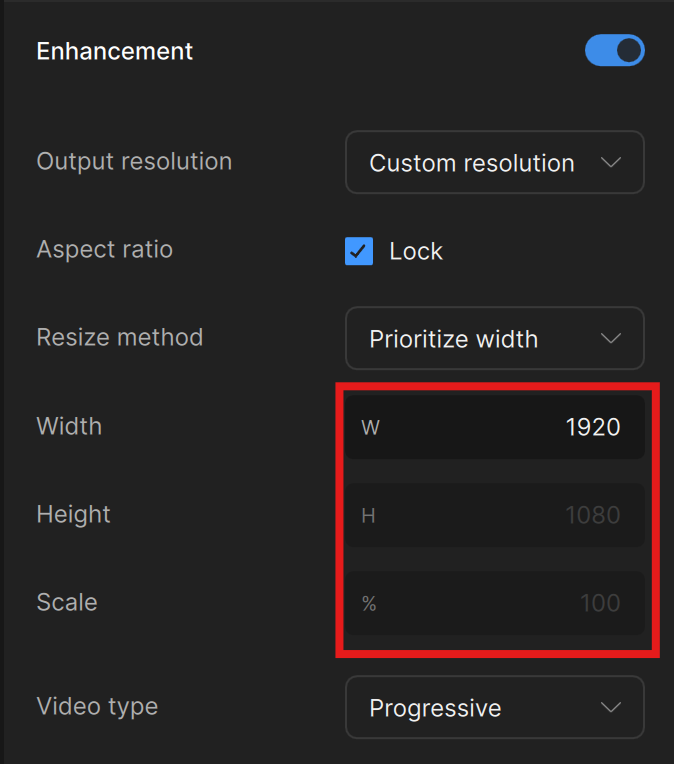
This is especially useful when you need a non-standard resolution. For example, if you want a specific width like 3200 pixels, select "Prioritize width," enter 3200, and the height will auto-calculate. If you need to avoid black bars on an uncommon aspect ratio, you can unlock the aspect ratio and manually adjust the width and height to reach your desired output.
Resolution Limitations and Codec Settings
One important thing to note: if you're using the default H264 codec and select a very high resolution like 4x Upscale (7680×4320), you may encounter a preview or render error. This is because H264 has a resolution ceiling. The fix is simple — switch to the Codec settings tab and change your codec to H265, which supports higher resolutions. Once you make that switch, the preview and render will work as expected.
Video Type
Below the output resolution, you'll find the Video type selector with three options: Progressive, Interlaced, and Interlaced prog.
Progressive
This is the most common setting and the one you'll use for the vast majority of modern footage. Progressive video stores each frame as a complete image. If your source was shot on a modern digital camera, smartphone, or any contemporary capture device, leave this set to Progressive.
When Progressive is selected, the available AI models include: Proteus (general enhancement for most videos), Iris (specialized enhancement for faces), Nyx (dedicated denoising), Rhea (advanced 4x upscaling), Artemis (denoise and sharpen), and Gaia (HQ/animation upscaling) — 7 models total.
Interlaced
If your source footage has visible horizontal lines running across the image — these are called fields — your video is interlaced. Interlaced video captures every other line of the image at slightly different moments in time, which creates a combing artifact when viewed on a progressive display.
This is common with older DV camcorder footage, analog TV recordings, and similar legacy formats. Selecting the Interlaced video type tells Topaz Video to deinterlace the footage, removing those field lines and producing clean progressive output.
When Interlaced is selected, the AI model list changes to show deinterlacing-specific models:
- Dione DV — Optimized for DV footage.
- Dione TV — Designed for analog recordings.
- Dione Dehalo — Analog footage with halo removal.
- Iris LQ — Face optimization for low-quality inputs.
- Iris MQ — Face optimization for medium-quality inputs.
- Proteus — General enhancement.
You'll also see a Field order dropdown (defaulting to Auto-Detect), which determines whether top or bottom fields come first. In most cases, leaving it on Auto-Detect works well, as Topaz Video does a good job detecting field order automatically. If needed, you can manually select Top Field First or Bottom Field First.
Interlaced Progressive
The third option, Interlaced progressive, is for a more specific scenario: footage that was originally captured as interlaced but was later rendered or exported as a progressive file with the interlacing fields baked in. This is essentially progressive footage that still contains interlacing artifacts from an earlier stage of production.
The models for Interlaced Progressive are a bit more robust and aggressive in how they treat the deinterlacing, since they need to handle the extra compression that comes with fields being baked into a progressive export. Available models include:
- Dione Robust — Corrects interlacing lines.
- Dione Robust Dehalo — Additional halo reduction.
- Iris LQ — Enhance faces for low-quality inputs.
- Iris MQ — Enhance faces for medium-quality inputs.
- Proteus — General enhancement.
Ready to continue diving into the rest of the enhancements found in Topaz Video? Move on to the next part of Topaz Video enhancements.